← Back to lessons

Make Claude Yours

Teach Claude how you work. CLAUDE.md files, memory, custom instructions.

Day 3 · 15 min

01

Project Instructions

Every time you open Claude Code in a folder, it starts a fresh conversation. It does not remember what you talked about yesterday. It does not know your preferences or your project’s conventions.

Unless you tell it.

The CLAUDE.md file

Create a file called CLAUDE.md in the root of your project folder (the same folder where your other files live, not inside a subfolder). Claude Code reads this file automatically every time it starts. Think of it as a briefing document. Whatever you write here, Claude Code follows.

Open Claude Code in your my-site project:

cd my-site
claude

Now try:

Create a CLAUDE.md file with these instructions:
- This is a personal website built with plain HTML and CSS
- Use dark backgrounds with blue accent colors
- Keep the design minimal and modern
- All pages should have the same navigation bar
- Use the font Inter for all text

Now close Claude Code (/exit) and reopen it:

claude

Ask it to make a change:

Add a blog page

Watch what happens. Claude Code reads CLAUDE.md first, then builds the blog page using your dark theme, your font, your navigation pattern. You did not have to repeat yourself.

What to put in CLAUDE.md

Anything that should be true every time you work on this project:

  • Design rules: colors, fonts, layout conventions
  • Technical choices: “use plain HTML, no frameworks”
  • Code style: “keep files small and simple”
  • Project context: “this is a portfolio site for a photographer”

Keep it short. A few bullet points is enough. Claude Code reads the whole file every session, so concise instructions are more effective than long essays.

02

Memory

CLAUDE.md is for project-specific instructions. Memory is for things Claude Code should know about you across all projects.

How memory works

When you tell Claude Code something about yourself or your preferences, it can save that to a persistent memory file on your computer. Next time you start a session, in any project, it has that context.

Try it:

Remember that I prefer dark themes and minimal designs for all my projects

Claude Code will save this preference. Now go to your my-tool folder, open Claude Code, and ask it to add something visual. It will default to dark themes without you mentioning it.

What to put in memory

  • Your name and role (“I’m a teacher building tools for my classroom”)
  • Your aesthetic preferences (“I like clean, minimalist design”)
  • Technical preferences (“I prefer Python over JavaScript when both are options”)
  • Things that went wrong before (“Don’t use framework X, it caused problems”)

Memory vs CLAUDE.md

The distinction is simple:

  • CLAUDE.md lives in a project folder. It applies only to that project. If you share the project with someone else, they benefit from it too.
  • Memory lives on your computer. It applies everywhere. It is personal to you.

Use CLAUDE.md for project rules: “this site uses plain HTML and CSS.” Use memory for personal preferences: “I prefer dark themes.” Both are read automatically. Neither requires you to repeat yourself.

03

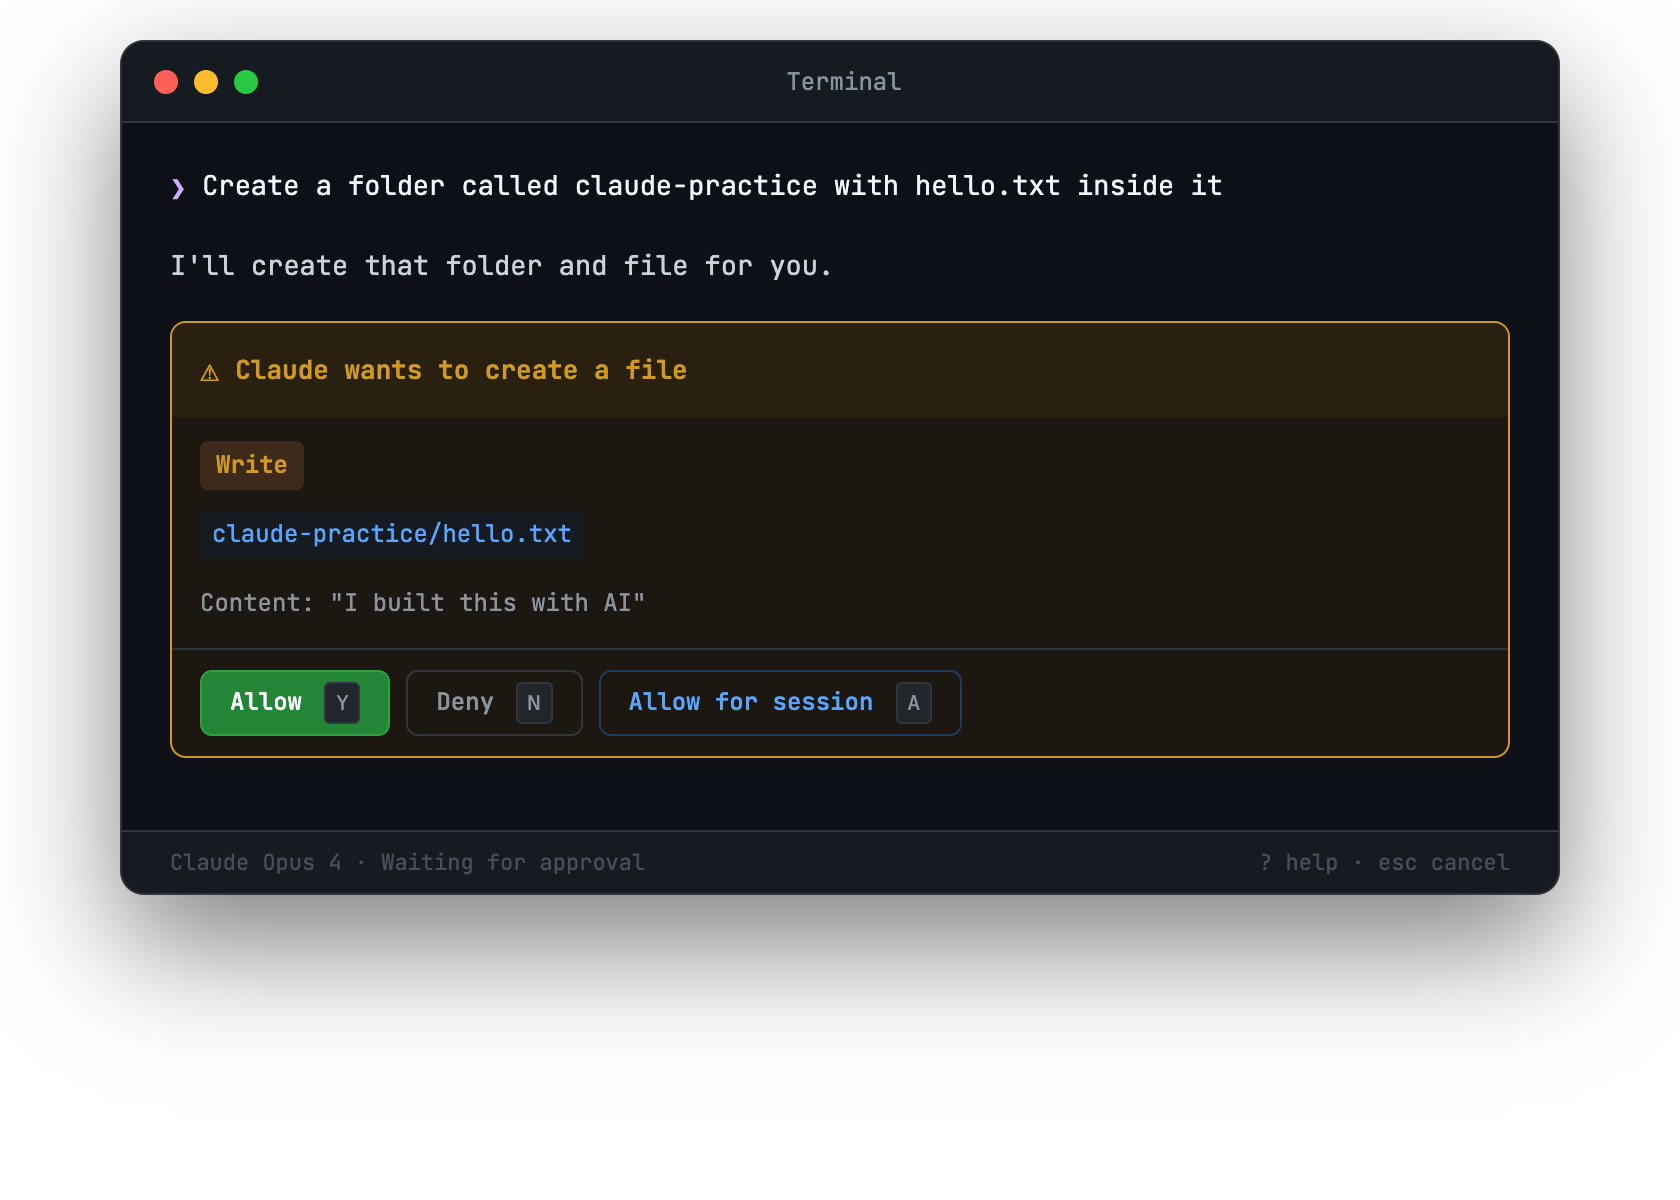
Permissions and Trust

By now you have approved dozens of actions. Every file creation, every edit, every command. That is the default behavior: Claude Code asks, you approve.

The permission prompt you have been seeing throughout the course

As you build trust, you can change this.

Allowing actions automatically

When Claude Code asks permission for something you always approve, you have options. During the permission prompt, look for choices beyond just “yes” or “no.” You can often allow that type of action for the rest of the session.

You can also tell Claude Code directly:

Allow all file reads and writes in this project without asking

Permission levels

Claude Code has different permission modes:

  • Default: Asks for every action. This is what you have been using. Best for learning.
  • Accept edits: Automatically approves file reads and writes, but still asks before running terminal commands.
  • Bypass permissions: Approves everything automatically. Only use this when you fully trust what you are building and understand the risks.

For now, stick with the default. Seeing every action teaches you how Claude Code works. As you get more experienced, you will naturally want less friction.

You are always in control

Even in the most permissive mode, Claude Code shows you what it is doing. You can always:

  • Press Escape to interrupt any action
  • Type /exit to end the session
  • Delete files Claude Code created (they are regular files on your computer)

The permission system exists to make your control explicit, not to slow you down. Over time, you will find the level that matches your comfort.

04

Your Workflow

You now have all the pieces. Let’s put them together into a workflow that works for you.

The daily pattern

Most people who use Claude Code regularly settle into something like this:

  1. Open Claude Code in your project folder. It reads CLAUDE.md and your memory automatically.
  2. Describe what you want to build or change. Be specific about outcomes, not implementation.
  3. Approve actions and watch the result. Refresh your browser, run the tool, check the output.
  4. Iterate until it is right. “Make this bigger,” “Fix the spacing,” “Add error handling.”
  5. Close the session. Your files are saved. Your project is updated. Pick up tomorrow.

Tips from experience

Start small. “Add a footer” is better than “redesign the entire page.” Small, focused requests get better results than vague, sweeping ones.

Be honest about what is wrong. “The spacing looks off between the header and the content” is more useful than “make it look better.” Claude Code can fix specific problems. It struggles with vague dissatisfaction.

Use Claude Code for exploration. Not sure if an idea will work? Ask Claude Code to prototype it. If you do not like the result, tell it to undo the changes. The cost of trying something is nearly zero.

Save your instructions. When you find a prompt that works well, put it in CLAUDE.md. “When creating new pages, always include the navigation bar and footer” saves you from repeating it every time.

What’s next

You have built a website. You have built a tool. You have customized Claude Code to work the way you like. One thing remains: putting your project on the internet so anyone can see it. That is the final lesson.